How do I align, group and layer objects?
Shift-click the objects to select them, then use the Arrange tab. Align lines up their edges or centers, Distribute spaces three or more evenly, Group (⌘⇧GCtrl+Shift+G) makes them move as one, and Bring to Front or Send to Back sets which one is on top.
- In Publisher
- Arrange, then Align, Group, Bring Forward, Send Backward
- In Korva
- Arrange tab, or the Format pane with several objects selected
The Arrange tab works on whatever is selected: text boxes, pictures, shapes and tables alike.
Select several objects
- Click the first object, then hold ⇧Shift and click the others. Shift-click a selected object again to take it out of the selection.
- Or drag a box around the objects, starting on an empty part of the page.
- Or press ⌘ACtrl+A to select everything on the page.
The Format pane then says how many objects you have, for example 3 objects — 3 text boxes.
Align and space objects
- Select the objects.
- On the Arrange tab, in the Align group, click Align left, Center horizontally, Align right, Align top, Center vertically or Align bottom.
- To space three or more objects evenly, click Distribute horizontally or Distribute vertically.

- 1Align
- 2Distribute
- 3Group
- 4Bring to Front
The same buttons are in the Format pane under Align to each other, with Distribute H and Distribute V.
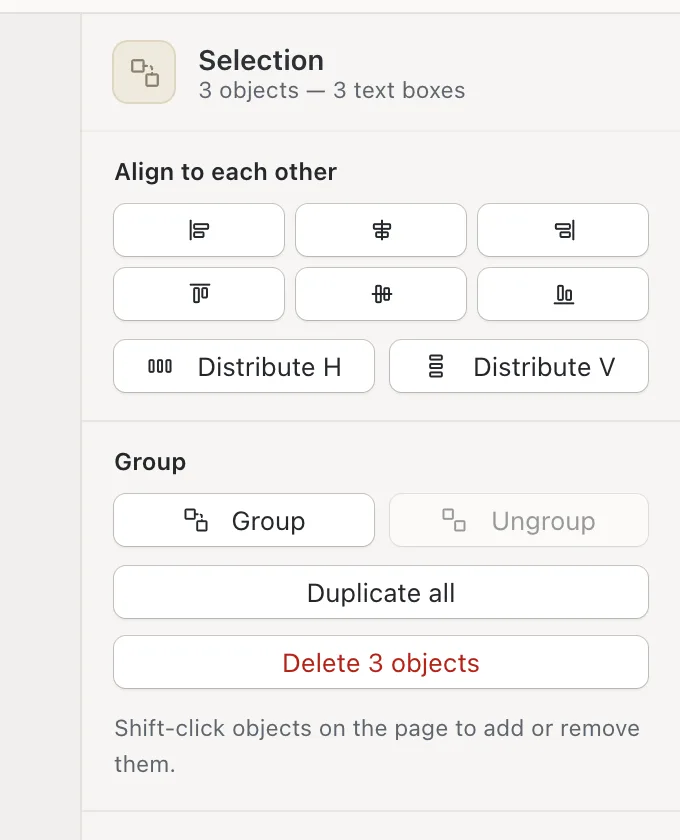
- 1Align to each other
- 2Distribute
- 3Group
Center one object on the page: select just that object and click an Align button. With one object selected, Korva aligns it to the page instead. The Format pane has the same choice under Arrange, then Align to page.
Group objects
- Select the objects.
- Click Arrange, then Group, or press ⌘⇧GCtrl+Shift+G.
A group moves, resizes and copies as one object. To take it apart, select it and click Ungroup (the same shortcut, ⌘⇧GCtrl+Shift+G). You can also right-click and choose Group or Ungroup.
Put one object in front of another
Objects sit in a stack: the one added last is on top. Select an object, then on the Arrange tab:
- Bring to Front (⌥F6Alt+F6) puts it on top of everything.
- Bring Forward moves it up one step.
- Send Backward moves it down one step.
- Send to Back (⌥⇧F6Alt+Shift+F6) puts it behind everything, for example a picture or colored box behind text.
On a Mac, ⌥Alt is the ⌥Alt key.
See every object on the page
Korva has no separate layers like a drawing program. Instead, Objects & Layers at the bottom of the Format pane lists every object on the page, the top one first.
- Click Objects & Layers to open the list.
- Click a name to select that object on the page. This is handy for something hidden behind other things.
- Drag a row up or down, or use its up and down arrows, to change the order.
- Click the eye to hide or show an object, and the padlock to lock or unlock it. A locked object can’t be moved or changed by accident.
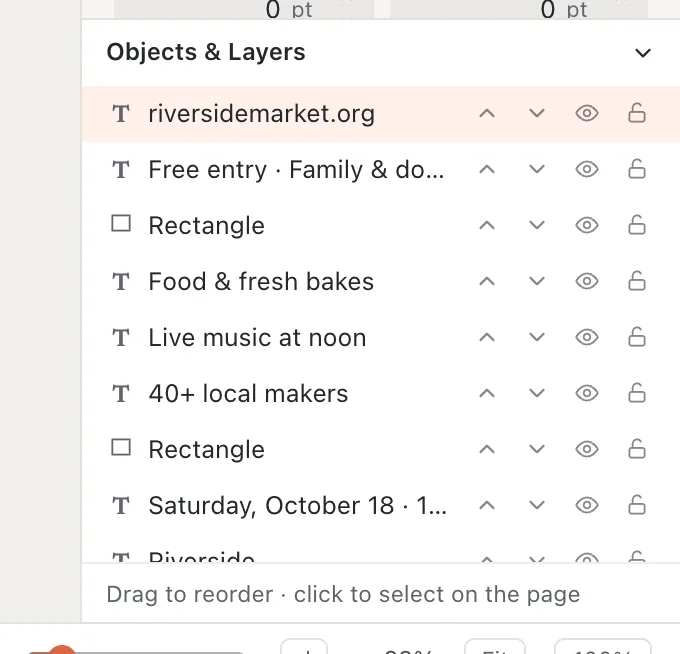
- 1Objects & Layers
- 2Hide / Show
- 3Lock / Unlock
If it still doesn’t work
Distribute is grayed out
Distributing needs at least three objects selected. With two, use Align instead.
I can’t select an object behind another one
Open Objects & Layers and click its name. Or select the front object and click Send to Back.
An object won’t move
It’s locked. Right-click it and choose Unlock, or click its padlock in Objects & Layers. If it’s a header, footer or logo that repeats on every page, it may come from a master page; see Master pages.
Something wrong or missing in this article? Email support or open an issue on GitHub.