How do I make a press-ready PDF for a print shop?
Open File, then Export, choose Press-ready PDF, and click Export press-ready PDF. It keeps your original pictures and adds crop marks with a 1/4-inch margin around each page. If the shop asks for CMYK, set Color to CMYK composite (print shop) first.
- In Publisher
- File, then Export, then Create PDF/XPS, then Options, then Commercial Press
- In Korva
- File, then Export, then Press-ready PDF
Free for your first project. Export it as many times as you like; exporting other projects needs Korva Pro. Free vs Pro
A print shop trims your pages after printing. It needs the exact page size, pictures at full resolution, and marks showing where to cut. Press-ready PDF sets all of that for you.
Export a press-ready PDF
- Click File, then Export.
- Under Print shop, click Press-ready PDF. Pictures changes to Original pictures (largest) and Crop marks is ticked.
- Leave Color on RGB (screen & most printers) unless the shop asked for CMYK. Then choose CMYK composite (print shop).
- If the shop wants them, tick Registration marks and color bar. This only works with Crop marks on.
- Read the check at the bottom. For a print shop it also looks for pictures under 200 dpi and for edge artwork that needs bleed.
- Click Export press-ready PDF, choose where to save, and click Save. The file name ends in -cmyk if you chose CMYK.
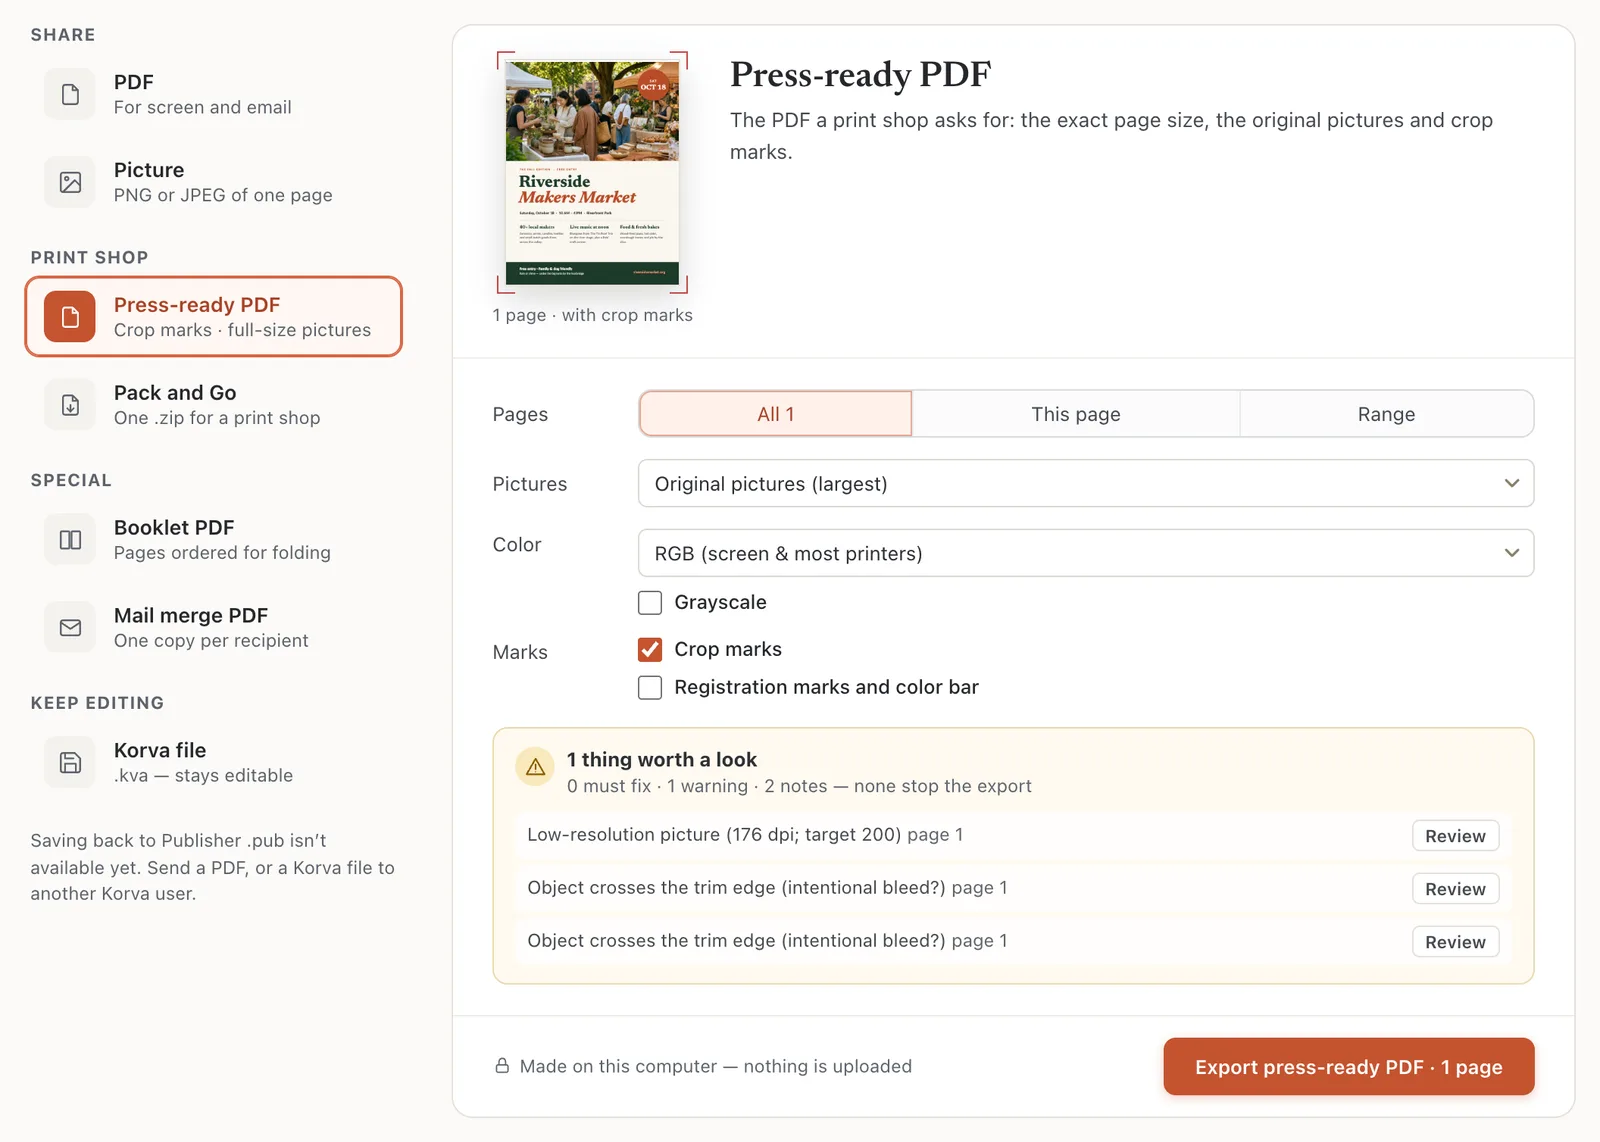
- 1Press-ready PDF
- 2Pictures
- 3Color
- 4Crop marks
Bleed: what Korva adds
Print shops usually ask for 1/8 inch (0.125 in) of bleed: background colour or pictures that run off the edge of the page must carry on a little past it, so no white sliver shows after trimming.
- With Crop marks on, each PDF page gets an extra 1/4 inch on every side. The crop marks sit in that margin, and the PDF records the finished size (the trim) and the bleed area for the shop.
- Anything in your publication that runs past the page edge prints into that margin, up to 1/4 inch.
- So for bleed, drag edge pictures and background shapes about 1/8 inch past the page edge. The check warns Edge artwork may need 0.125 in (9 pt) bleed past the trim when something stops exactly at the edge.
What CMYK composite does and doesn’t do
Print shops often ask about colour. Here’s exactly what Korva produces:
- CMYK composite writes text, shapes, lines and colour fills in CMYK.
- Pictures stay RGB. Korva doesn’t convert photos to CMYK. Most shops convert them when they print. Ask if they need CMYK photos.
- No spot colours (Pantone) and no colour profiles (ICC) are added.
- Grayscale turns the whole PDF, pictures included, to black and white.
If a shop needs a specific PDF standard such as PDF/X, Korva doesn’t produce one. Send them the press-ready PDF and ask whether it works for them.
If it still doesn’t work
The shop says the pictures are low resolution
The check lists any picture under 200 dpi as Low-resolution picture (… dpi; target 200). Make sure Pictures is set to Original pictures (largest). If it still warns, the picture itself is too small for its size on the page. Use a bigger original or make it smaller on the page. See Insert pictures.
There’s a white edge after trimming
The picture or background stopped at the page edge. Drag it about 1/8 inch past the edge, then export again.
The shop asks for the original files and fonts
Use Pack and Go. It puts the press-ready PDF, the editable file and all pictures into one .zip. Font files aren’t included.
The colours look different on paper
Screens show colour with light, printers with ink, so bright blues and greens often print duller. Ask the shop for a printed proof before a large run.
Something wrong or missing in this article? Email support or open an issue on GitHub.